1. Introduction #
Modern smart home technologies allow automating many daily activities, and controlling blinds is one of the most popular solutions. Blinds raised at a specific time support waking up in the morning by letting natural light into the room. Automatic blinds can adjust their operation based on time, weather conditions, or the household schedule, providing proper lighting conditions and indirectly contributing to better energy management in the building (e.g., protection against excessive heat in summer). From this tutorial, you will learn how to implement a blinds control system using the DOMIQ/Expander module and Satel INT-IORS.
2. What will you need? #
To implement the presented functionality, you will need the following devices:
- DOMIQ/Base – the base module of the DOMIQ system.
- DOMIQ/Expander – an expansion module to which you can connect up to 32 Satel INT-IORS devices.
- Satel INT-IORS – a device equipped with 8 relay outputs, allowing control of up to 4 blinds.
- Blinds you want to control.
- Mobile device with the DOMIQ/Remote app.
- (Optional) A wall button to control the blinds. Later in the tutorial, we will present both single- and dual-button control.
3. Initial configuration #
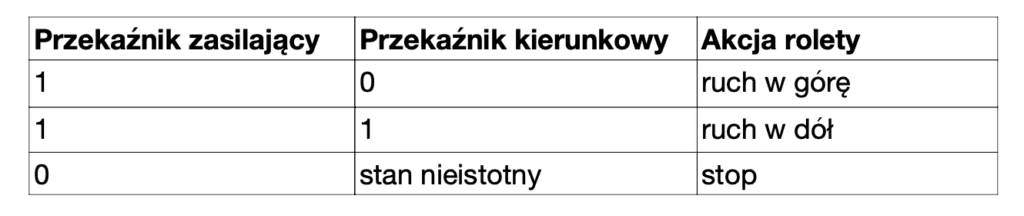
1. Properly connect the blind motor to the relay outputs in the INT-IORS module. Blind control is carried out using a pair of relays, where the first relay in the pair powers the motor and the second selects the direction of the blind movement. The table below presents relay states and the actions performed by the blind:
2. Set the address of the Satel INT-IORS module using dip-switches. In our examples, we used address 1.
Connect the Satel INT-IORS module to the DOMIQ/Expander module according to its configuration manual (you’ll find it on our website in the section: Modules > Expander).
4. Controlling blinds in DOMIQ #
In the DOMIQ system, there are three blind control modes available, making it easier to adjust the method to the conditions of a specific installation and the client’s needs.
To implement all types of control, the identifier EXP.shutter.E.R is used, where E is the address of the INT-IORS expander (0–31) and R is the blind number. Allowed values: 1–4 or all – controlling all four blinds at once.
4.1. Single-button control #
As the name suggests, this control method can be implemented using a single wall button or the Button widget in the Remote app. The blind control in this case switches through a closed cycle: up – stop – down – stop, etc.
Control from the Remote app #
This refers to the Remote tab in the Base module configurator. We assume control of the first blind in the module with address 1.
- Add a Button widget and double-click it to begin editing.
- Click +Command
1. Name: C.EXP.shutter.1.1
2.Value: toggle - Save the Remote tab.
- Done!
Control from a wall button #
In this case, a single bell-type button is required, connected to the INT-IORS module input. Each press is detected as an event in the Base module and assigned a command to toggle the blind. For this example, assume the button is connected to input 1 of the module with address 1.
- In the Events tab, add a new event and configure it as follows:
- Channel: E.EXP.input.1.1
- Data: 1
- Actions > +Command
- Name: C.EXP.shutter.1.1
- Value: toggle
- Done!
You can use both of the above methods for simultaneous control of four blinds connected to INT-IORS. Just enter: C.EXP.shutter.1.all in the Name field.
4.2. Dual-button control #
This control method requires two buttons. The first switches the blind between: up – stop, the second: down – stop. Each button press toggles between those two states.
Control from wall buttons #
The setup is almost identical to single-button control, but you’ll define two events – one per button.
For the up-stop button, use toggleup in the Value field.
For the down–stop button, use toggledown in the Value field.
We do not present Remote app control here, as the next section is dedicated to that.
4.3. Control using the Blind widget #
This is the dedicated control method using the Remote app. The configuration is very simple (done in the Remote tab):
- Add the Blind widget from the Channel widgets group.
- Double-click it to edit.
- Label: enter the blind description.
- Channel: EXP.shutter.1.1
- Save the configuration.
- Done!
The Blind widget sends commands up, down, or stop depending on its state – a typical set of commands for blind control using the Expander module. This command set can also be used in timers and events, which we will describe later.
The table below contains a summary of blind control commands available in the DOMIQ system:

5. Automation #
Automated blind control is an important aspect of the smart home. It saves you time – eliminating the need to remember to set the blinds. Proper blind management also affects well-being. Numerous studies on brain function have shown that sleeping in complete darkness improves rest, while access to sunlight just before waking helps you get up more easily.
In the DOMIQ system, you have full control over what time your blinds should open or close. In the rest of this chapter, we show how to link blinds to timers, which you can control freely.
5.1. User Interface #
To allow the user to select the opening and closing time of the blinds, a proper user interface must be created and made available in the Remote app. To make the settings persistent, we’ll use MEM variables, which are saved in the non-volatile memory of the Base module – meaning they are retained even after power loss. The description refers to the Remote tab in the configurator.
The first step is to create a suitable structure for the widgets controlling the blinds. For this tutorial, we assumed that all these widgets will be grouped within a separate page in the app structure. Alternatively, you can add the widgets to the pages dedicated to individual rooms.
Add a new Page and name it e.g. Blinds. You can also select an icon for easier navigation. Before continuing, choose one of two layout approaches:
- You can create sections for individual rooms – this is ideal when a room contains more than one blind. Remember to name each section appropriately.
- Or you can add all widgets into a single section and name the widgets accordingly.
We chose the first approach – creating separate sections per room. In each section, we’ll add the Blind widget and widgets for managing open/close time.
So now add a Section widget and name it. Inside the Section, add the Blind widget from the Channel widgets group. If you’ve already done this in section 4.3, just move the widget into the structure. Otherwise, follow this procedure:
- Double-click the widget to edit.
- Label: enter the blind description.
- Channel: EXP.shutter.1.1
We are using blind no. 1 in the module with address 1.
Next, we’ll add widgets for managing the opening and closing times of the blind. Both will use MEM variables. For clarity and easy naming, we’ll use this convention (not mandatory, but helps maintain order):
MEM.shutter.E.R.(up-down).(h-m), where E is the expander number, R is the blind number up / down is the direction h / m is used for hours and minutes.
Examples:
MEM.shutter.1.1.up.h – MEM variable storing the hour of opening blind 1.1MEM.shutter.1.1.up.m – MEM variable storing the minute of opening blind 1.1
Both variables together define the full time for opening a specific blind.
So now:
- Add a Time widget and open it for editing
- Label: Opening
- Hour channel:
MEM.shutter.1.1.up.h - Minute channel:
MEM.shutter.1.1.up.m
Similarly, add a Time widget for closing, changing the MEM variable names to: MEM.shutter.1.1.down.h and MEM.shutter.1.1.down.m.
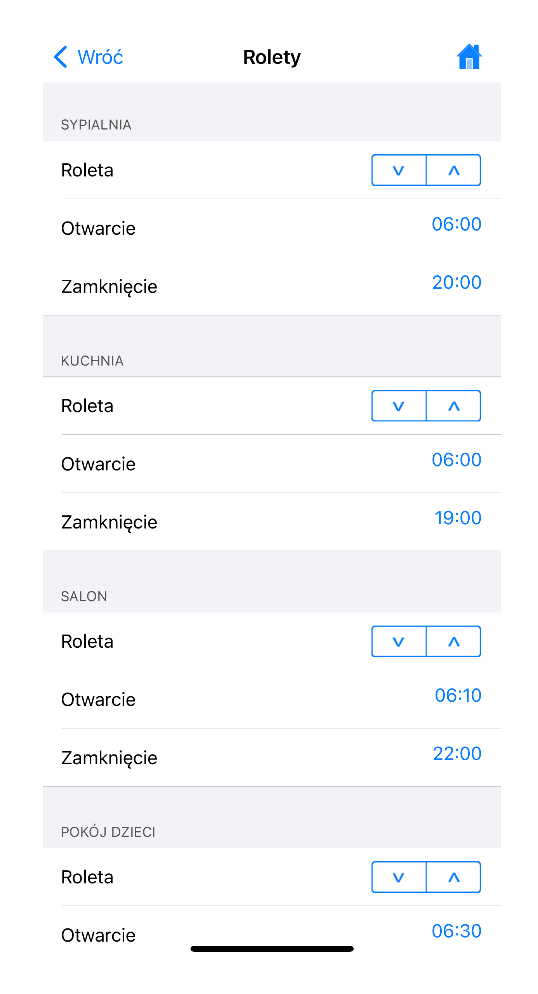
Effect in the Remote app:
5.2. Timers #
The final element is linking the user interface with timers to automate the whole system. As you may guess, we need two timers – one for opening, one for closing. In the timer configuration, we’ll use the MEM variable names created in the previous step as input data that determines when the timers run.
In the Timers tab, add a timer and configure it as follows:
- Description: Enter the description, e.g. bedroom blind open
- Hour: MEM.shutter.1.1.up.h
- Minute: MEM.shutter.1.1.up.m
- Actions > +Command
– Name: C.EXP.shutter.1.1–Value: up
Now add the second timer and configure it similarly:
- Description: bedroom blind close
- Hour: MEM.shutter.1.1.down.h
- Minute: MEM.shutter.1.1.down.m
- Actions > +Command
Name: C.EXP.shutter.1.1
Value: down
- Actions > +Command
Finally, save the Timers tab.
6. Summary #
Congratulations! You now know how to configure the system for controlling blinds using DOMIQ and Satel INT-IORS modules. You should also know all control modes available in the DOMIQ system and how to use timers to automate blinds.